

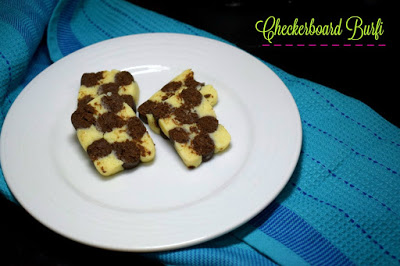
Checkerboard Cake is a rich decadent cake with layers of chocolate and vanilla cake in a checkerboard pattern. This is a quick Microwave recipe topped with creamy Chocolate Ganache and sprinklers, a real crowd-pleaser.

I have always been wanting to make these fancy cakes and this Checkerboard Cake is a favorite of mine. Since this cake requires many steps, I have been procrastinating. However, Konda has been after me to bake some designer cakes with loads of cream and frosting.
I told her I am not a person cut out for that much cream and frosting. I am an instant cake person with ganache as the best frosting I will ever invest my time in. However, since theme I picked up was on Checker board dishes, it pushed me to think I can spend my time on this.
So as a way to salvage time and efforts, I resorted to Microwave Cakes. I love Microwave Cakes as they are instant! And I also believe you can save so much time and the texture is still the same. As always I take a leaf out of science to approach this baking.

This Microwave Chocolate Cake with Apple Cider Vinegar is the best Microwave Cake for Cupcakes and for instant ones. It uses acid and oil to aerate the batter. It's low fat as well as there is no dairy in this batter. Suits best for smaller baked treats like cupcakes.
In today's cake, the cake has to be sturdy, hence some protein for the structure. I activated the reaction by adding hot water to the batter at the end. Since there is no milk protein in straight form, the texture does end up being slightly rubbery. However, you can negate it by warming it before eating.
If you are looking for that exact crumbly oven-baked cakes, you can check out this Eggless Chocolate Cake or Microwave Chocolate Cake that is just like your regular OTG Cakes and yet baked much faster. These are single layer cakes and can't be trusted to be layered to hold their shapes.
Jump to:
Ingredients you will need!
Since this is an Eggless cake with chocolate and vanilla flavours set in an alternative pattern, we will need a dense yet firm cake to hold the shape. So I used condensed milk along with curds.

I used same measurement for both vanilla and chocolate cake with 1 tin of condensed milk split between the cakes. First we will have the ganache prepared and stocked. For the the Dark Chocolate Ganache, we will need:
Instructions with Step by Step Pictures
We can get the dark chocolate ganache ready before proceeding to the cake preparation
Dark Chocolate - 1/2 cup + Milk Chocolate - 1/4 cup cooked with Cream
Sprinkles for Decoration

For the Dark Chocolate Ganache.
Boil the cream and add chopped chocolates. Stir well to melt the chocolate. Let it stand to thicken.
For making the Checkerboard Cake:
For the Vanilla Cake
We use All purpose flour along with half of the sweetened Condensed Milk. Since I felt the final cake ends up being less sweet, I added 2 to 3 tsp Sugar. You can skip if you want.
To make this eggless, we use Olive Oil activated by the curds and leavening agents like Baking powder and Baking Soda. The hot water activates the whole process, so make sure you have all the things handy and ready to be baked before mixing in the ingredients.


For the Chocolate Cake
For making the chocolate cake, use the same ingredients along with Cocoa Powder and Instant Coffee Powder
Making the Sugar Water
Make a simple sugar water by dissolving sugar in Water. Boil the water and melt the sugar and make a thick syrup.
For best effect, prick the cakes and pour the sugar syrup by spoons so that the cake stays moist. I did this step after the layers are made and also by then the cake had settled in.

Assembling the Checkerboard Cake
To make a checkerboard cake, we need two vanilla cakes and two chocolate cakes.
For making the layers, I used 4" and 2" cookie cutters. Check out the step by step pictures for understanding how the layers are cut and then assembled.
Cut eat cake into 3 layers.

If your outer layer is chocolate, insert the vanilla layer into it, followed by the chocolate layer.
Apply the ganache on each side. After you assemble the cake again, spread over it. Then repeat with the remaining 3 cakes.
Your Chocolate Ganache should be of pouring consistency if you want it to over on the sides.
Garnish with sprinkles all over.


Substitutions & Variations
Since this is a quick version of the regular OTG cake, made using Microwave, you can't really substitute much in terms of texture.
Equipment
I have used Microwave Convection Oven to bake the cakes. Please always remember that baking in microwave mode requires the batter to have more moisture and the cooking time is very limited like just 30 seconds each spurt.
Storage
You can store the baked cake for two days, bring to room temperature and then microwave again for 30 seconds for two times before serving.
Expert Tips
- Since this is MW baked, if you bake for 1.5 mins is more than enough. Ensure you add the sugar syrup right away for the cake to remain moist.
- As I was freezing the cake, I used oil, and that also came the cake a slight rubber texture. However if you serve it warm you won't be able to feel that.
- If using butter, the texture improves much. However on freezing the cake turns little more dense.
- Each layer needs to have the ganache applied on the sides and on top. Else when you slice through the cake, the chances of each bit crumbling away is more.
- The best part of this cake is that its easy to bake, it freezes well and when you warm it for 30 secs before serving, it is as good as just baked!
Looking for similar recipes?
Try these:


Other Interesting Recipes:
- Eggless Chocolate Condensed Milk Cake
- Fat Free Eggless Chocolate Cake
- Eggless Wholewheat Ragi Triple Chocolate Cake
Recipe

Microwave Eggless Chocolate Vanilla Checkerboard Cake
Ingredients
For the Vanilla Cake
- 1 cup All purpose flour
- 200 ml Condensed Milk Half tin
- 2 to 3 tsp Sugar
- 1/4 cup Olive Oil
- 1 tsp Baking powder
- 1/2 tsp Baking Soda
- 1/2 cup Curds
- 1/4 cup Hot water
- Pinch of Salt
- 1/2 tsp Vanilla Essence
For the Chocolate Cake
- 1 cup All purpose flour
- 200 ml Condensed Milk Half tin
- 4 tsp Sugar
- 1/4 cup Olive Oil
- 1 tsp Baking Powder
- 1/2 tsp Baking Soda
- 1/2 cup Curds
- 1/4 cup Hot Water
- Pinch of Salt
- 3 tsp Cocoa Powder
- 2 tsp Instant Coffee Powder
- For the Sugar Water
- 1/2 cup Water
- 4 tsp Sugar
For the Dark Chocolate Ganache
- Dark Chocolate - 1/2 cup + Milk Chocolate - 1/4 cup
- 200 ml Cream
- Sprinkles for Decoration
Instructions
How to make the Cakes
For the Vanilla Cake
- Take the flour in a bowl, add baking powder, baking soda, and fluff well. Then, mix in condensed milk, vanilla essence, olive oil, sugar, curds, gently mix everything well.
- Add the hot water at the end by making sure the batter is well combined. Grease the bowl with ghee a bit. Transfer 3/4 cup of the batter to the MW sage bowl.
- MW for a minute. Rest for few seconds, MW again for 30 secs.
- Pour the remaining batter and MW again for 1.5 seconds.
For the Chocolate Cake
- Proceed as you did the same for Vanilla Cake, except by adding Instant coffee powder, cocoa powder, 1 tsp sugar and few tsp of water extra than the vanilla cake.
- MW for 1.5 mins again.
For the Sugar Water
- Boil the water and melt the sugar and make a thick syrup.
- For best effect, prick the cakes and pour the sugar syrup by spoons so that the cake stays moist. I did this step after the layers are made and also by then the cake had settled in.
For the Dark Chocolate Ganache.
- Boil the cream and add chopped chocolates. Stir well to melt the chocolate. Let it stand to thicken.
Assembling the Checkerboard Cake
- To make a checkerboard cake, we need two vanilla cakes and two chocolate cakes.
- For making the layers, I used 4" and 2" cookie cutters. Check out the step by step pictures for understanding how the layers are cut and then assembled.
- Cut eat cake into 3 layers.
- If your outer layer is chocolate, insert the vanilla layer into it, followed by the chocolate layer.
- Apply the ganache on each side. After you assemble the cake again, spread over it. Then repeat with the remaining 3 cakes.
- Your Chocolate Ganache should be of pouring consistency if you want it to over on the sides.
- Garnish with sprinkles all over.
Notes
- Since this is MW baked, if you bake for 1.5 mins is more than enough. Ensure you add the sugar syrup right away for the cake to remain moist.
- As I was freezing the cake, I used oil, and that also came the cake a slight rubber texture. However if you serve it warm you won't be able to feel that.
- If using butter, the texture improves much. However on freezing the cake turns little more dense.
- Each layer needs to have the ganache applied on the sides and on top. Else when you slice through the cake, the chances of each bit crumbling away is more.
- The best part of this cake is that its easy to bake, it freezes well and when you warm it for 30 secs before serving, it is as good as just baked!
PIN This for Later!

sushma says
Yummy Yummy cake, looks delicious
Ruchi Indu says
hmmm delicious cake
Srividhya Gopalakrishnan says
microwave check board cake? wow wow wow wow.. what can I add more? Great Valli
rajani says
I thought I left a comment here yesterday. I think the cake looks festive and the microwave part is pure genius!
Smruti Shah says
Cake in a microwave sound amazing. And a checker board one sounds even better! Great one Valli!
Priya Suresh says
I dont mind having a super huge slice of this beauty, alluring cake.
Pavani N says
Can't believe that you made this cake in the microwave. It looks absolutely sinful.
Vaishali Sabnani says
Wow ! Making a checkerboard is like a dream . It definitely requires lot of patience and time . It looks visually striking with alternating squares . And the best is you get two flavours in a single cake .
Valli , great job , and I am so tempted to dig in .
Kalyani says
Using cookie cutters and asembling a checkerboard cake in he microwave is genius.. Am hiding this recipe from my kiddo who's after me to bake cakes for her snack box. Brilliant share, Valli
Pradnya says
Hats off for the patience with which you create the post....very detailed and step by step. I am waiting to go back to my baking and start making beautiful cakes all over again. This was inspiring
Sandhya Ramakrishnan says
Tell me about baking a designer cake!! I can bake bread or muffins any day but cake always takes a back seat! You have made this checkerboard cake like a pro! Looks absolutely marvelous and kids would love this.
Srividhya Manikandan says
This checkerboard cake is on my todo list too. Making it on microwave is amazing. Will definitely try it out. The texture looks amazing Valli.
Usha Rao says
Step by step pictures are so helpful for this recipe. I lost you at how you made the checkers. When you mentioned go back to the sbs pictures to see how it is made, then I was clear on the steps.. It is is bit time consuming and making it in the microwave is a good idea to reduce the total preparation time. Beautiful and delciiosu cake!